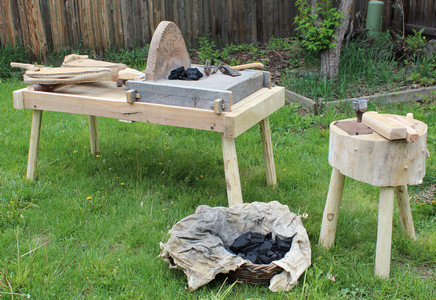

 I put together this portable, primitive forge for the purpose of doing demonstrations at the various events we go to. An actual forge of this type would not be carried around but would be in a permanent spot. For portable purposes, one can simply dig a hole in the ground, place your bellows beside the hole and fire it up. That simple. But there is were we depart from the reality of Viking age blacksmithing. Each of our events are in locations that require us to come in, set up and present, then have a quick tear-down, often within an hour of closing time.
Because many of our events are within city or state parks the concern of management's is that I don't destroy their Kentucky Bluegrass. Difficult to avoid if the forge runs long enough to do any basic operation. I'm lucky to live in a city with allot of hi-tech industry and development going on and through my connections I was able to procure a small sample of actual space shuttle tile. That and high temperature furnace wool insulation protect the bottom surface completely for the forge's heat. These precautions permit the grass to go undamaged. So the cement is there to protect the insulation beneath. I'd never forged with charcoal and found the fire to raise it's heat quickly and the metal moved very well. I expect the fire table will gain a better patina, look less like cement, as I use the forge.
(Later addition:)
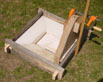
Partly because I am getting to be an old man and less comfortable on my knees, I have added a table to support the forge body. You see the new table to the upper right. The legs are made to fold inwards like a folding table for transport.
The resulting work area is standard table height, adjusted for my stature. We now have the option of setting the forge body on the ground or on the table.
Seen on the vertical hearthstone is a picture of Loki, who, among his many talents, is the guardian of the fire but he is shown here with his lips sewn shut, a result of his failed bet with a dwarf who assisted his blacksmith bother to make Thor's magic hammer, Mjollinr. Loki tried to ruin the project by turning himself into a horsefly to bother the apprentice Brokk who was pumping the bellows. Though Loki avoided loosing his head in failing his bet, the dwarf still punished Loki for his idle boasts. You will find the story in Snorri Sturluson's Prose Edda, the Skaldskaparmal
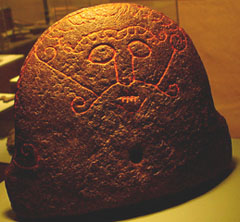
On the left is a picture of the original hearthstone called the Snaptun stone, recovered in Denmark and on display at the Moesgard Museum.
Click on the thumbnails below for a larger picture of the construction details.
|
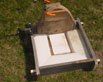
In the center of the forge body's box you can see the space shuttle tile positioned directly under the fire pan's location. I left a space around th soft tile to support the refractory cement from accidental downward pressure that might occur during transport or miss-handling. I then cut some closed cell foam insulation to fill the areas I did not want the refractory cement to enter. After the cement dried, I removed the plywood bottom of the box and took the foam out. This left an air pocket cavity I later filled with high temperature fiberglass wool. |
|
Another view of the forge before I poured the refractory cement. The hearthstone is supported by a stick, temporarily screwed to the wooden box, which was removed after the cement set up. In the close-up you can also see a grove I routed along the upper edge, so the cement would cast a support lip into the wood box. This was also to give the forge a "locked together" effect. I worry allot about transportation damage. : P |

|
The refractory cement has been poured and the closed cell foam removed. You can see the space shuttle tile, including it's coded parts numbers. It is surrounded by a barrier of cement to form the support base and the air space is now being filled by high temperature rock-wool. After the rock-wool was in place, the plywood bottom was replaced, finishing the forge. |
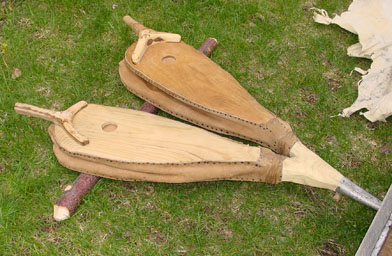
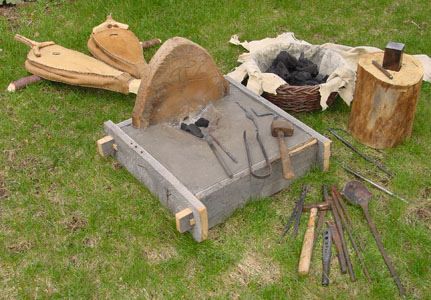
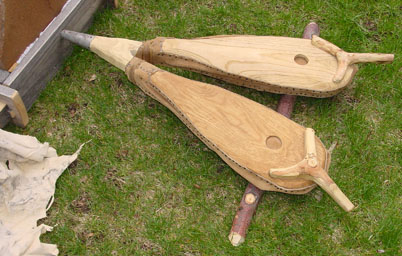 Here you see my double bellows. You will notice that they have two different types of wood composing the bellow's tops. This is so the apprentice can tell the difference between his left and right... (I need smarter apprentices.) No, I made these bellows from scrap wood leftover in my shop. One is oak and the other white ash. In typical fashion of workers of the time, if the type of wood needed was irrelevant, you used what you had.
The bellows have two valves built internally for each side, fore and aft, so the air only moves forward, preventing the fire from being sucked back into the bellows on the upward pull. They terminate into a natural crotch of a branch, drilled to join the air flow into the final tapered tube that goes into the forge body.
For the sake of ease of setup and to protect the bellow from damage during transport, the rough branch you see under the pair is screwed permanently in place. I have too many "helpers" who handle the equipment roughly that without the cross bar, they would never last. I stake the crossbar to the ground while the forge is in use, which makes the operation easier for my apprentices. Especially if a horsefly attempts to bother them.
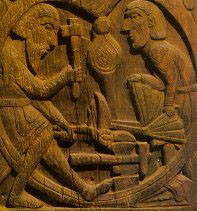
 These bellows are modeled to reflect the bellows illustrated on the door posts in Hylestad Church in Setesdal, Norway. (Left.) Here the wood-carving depicts Regin reforging the sword for Sigurd. The doors were carved in the 12th century.
 Then you also find the bellows on an earlier rock petroglyphs carved about 1000 CE, called the Ramsund carving. (Right.) The rock and the door depicts the story of Sigud who has killed the dragon Fafnir and later the blacksmith Regin. Regin's tools are scattered around, including tongs, a hammer, an anvil in the shape of a "bick" or "beak" and lastly you can see his double bellows.
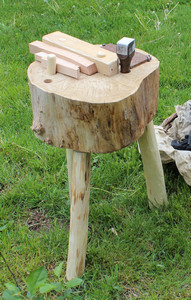 I would rather have the anvel on a solid log, but as we setup on different sites, I selected a well seasoned log section and mounted legs under it. The anvil itself is made from a re-purposed jack hammer chisel/blade. Along side is a plate of iron to be used as a cut plate, to save the chisels when cutting metal and the wood blocks are a wooden peg and wedge vise clamp system. Also pictured here is a willow basket with hardwood charcoal fuel. I'll be forging more tools soon. Time will tell.