
Fjellborg Vikings
Hedeby Chest:
Assumptions and Deductions
This chest I made is an interpretive work. These are some of my thoughts on how I built it.
One Hasp or Two?
 This is an examination of what I see as evidence that the Hedeby chest had two hasps, such as on the Mastermyr chest. Although I looked at that chest for comparison, it was details on the archaeologists drawings that lead me to build it the way I did.
I'm assuming you've printed the sheet I have a link to on the previous page, so refer to that for other details. In this first picture, I photoshopped the lid and the lock right next to each other and these details are what I see.
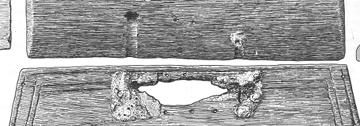
(1.) The lid has indentations from where the wood has deteriorated while the hasps rusted. This is evident on the hinges also. If you accept one as evidence of missing iron, you must accept the other.
(2.) Directly below the assumed hasp locations, there are two vertical lines that indicate to me, holes for the hasp bails. (Like on a Samsonite suitcase.) They are at different heights, which can be explained by this next drawing. I have no proof of the mechanism but this is a reasonable possibility of why the hasp's staple holes are not straight across, at the same level.
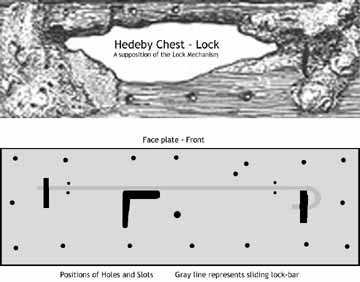
I made an overlay of the original lock plate area, then copied the placement of known details and made assumptions of others.
(3.) Last, the hole behind the lock plate, if you assume it was originally there and not a result of rot, it is consistent in a generalized way to hold a similar lock as was the Mastermyr lock.
The Shape of the Lid
Here you see drawings of the lid, including registration marks showing where the cross-section of the lid was taken from. For clarity, I included an illustration of the Mastermyr tool box, with similar marks and showing it's cross-section.

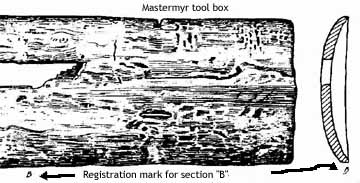
However, though I got the thickness of the lid correct, I did not have the shape right, as evidenced by this overlay.
Other "mistakes" I made are that the ends have different inward sloping angles, mine are the same. Also all side boards are thinner at the tops, mine are just standard plank width.
The Hinges
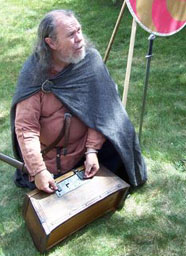
 Another choice I made was to make the hinges to be "barrel shaft" hinges and NOT like the Mastermyr hinges. This is because the museum reproduction of the Hedeby chest (On the left of this page.) also did barrel hinges. I assumed the maker of the reproduction had direct access to the original chest. I also believe another reenactorism is that the Vikings did not know about barrel hinges. There were contemporary barrel hinges found at Birka and Swallowcliffe, England. Barrel hinges go WAY back in history.
The Finish
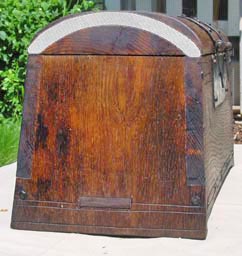
My intent was to achieve a look of a chest that had been exposed to the weather on board ship, spent winters indoors absorbing greasy smoke, re-oiled and having the process repeated again and again.
The way I got the look I did, was first I fumed the oak box with ammonia, then I buried the box in my compost heap for a few days. After that treatment I oiled the chest with linseed oil and bee's wax. I wanted a spontaneous and random staining and a dark look of weathered/oiled oak. When I look at oak that has suffered weathering and then was oiled, it looks similar.
The Role of a Reenactor's Reproductions
There are reasons the museum chose not to reproduce the lock, that is that museums try NOT to make presumptions as I did. Reenacting is an interpretive art and making reproductions is like an artist painting a picture. No artist claims to be reproducing reality but rather causing the viewer to believe.
You may chose to interpret the chest differently. This is your choice. I know I achieved what I intended, I had fun.
- Lodin
Return to the Previous Page